Homemade Artisan Rye Bread

Let me first say… I do bread.

The learning – for me – took a few twists and turns but eventually I learned how to deal with yeast.  In the beginning of my journey my loaves were just plain gorgeous, as were my yeast coffee cakes – however no one could eat them.  They weighted about 2 tons out of the oven and the only result back then that I could guarantee was that I would have another beautiful piece to varnish and use as a doorstop.  Oh, we laughed heartily back then about all those gorgeous “mistakes”  I made.   

I couldn’t seem to follow a recipe and get a result that we could actually eat.  Finally I was able to master the yeast – get to understand what it wanted from me to perform it’s best and what I needed (without fail) to do to insure it worked as it should. 

And then… I could say – I do bread.  And I still do bread and cinnamon rolls, and other items containing yeast without hesitation.  I started making bread because of my allergies.  It seems most commercial products contained some form of corn.  I am allergic to corn, and also fructose so that I cannot have anything containing either corn or fruit.  When I found this out and started reading the labels I knew that I needed to start making bread for my family all the time.  

Fast forward to today.  My favorite breads to make today are the Artisan breads. When making Artisan loaves – especially the Artisan Bread in 5 Minutes a Day from Jeff Hertzberg, MD and Zoe Francois or the No-Knead Breads from Jim Lahey and Sullivan Street Bakery – you discover just how easy and fun making your own fresh baked bread can be.

I really wanted to try the rye bread… so here is my first attempt at Artisan Rye Bread!

This recipe is from the Artisan Bread in 5 Minutes a Day Cookbook and is slightly adapted because I cannot use either the cornmeal for sprinkling nor the cornstarch for the cornstarch wash they recommend.  If you want their recipe and to know about those two items, you will have to check out their book for that information.

I am listing the names of the ingredients I used because I have found that sometimes, the actual brand will make a difference in the finished result.

3 Cups Lukewarm Water (I made my 100 degrees)
1 1/2 Tbsp Fleischmanns® yeast
1 1/2 Tbsp Morton® Kosher Salt
1 1/2 Tbsp caraway seeds (plus more if you want to sprinkle them of the outside)
1 Cup of Organic Whole Grain Rye Flour from Arrowhead Mills®
5 1/2 cups Gold Medal® All Purpose Flour
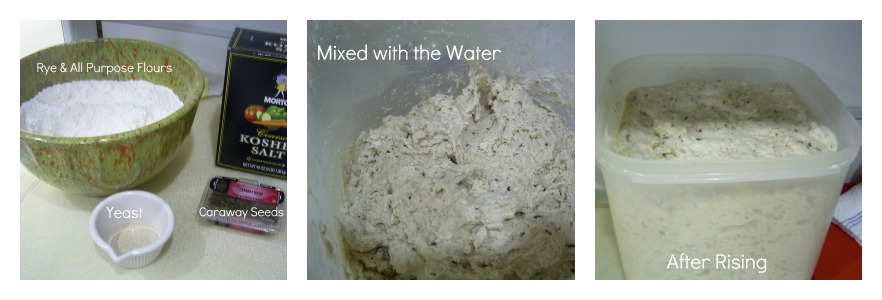
rye process for artisan bread

Mix the rye and all purpose flour and set aside.  Next mix the caraway seeds, the yeast, and the salt into the water in a large container.  Once mixed, add in the dry ingredients.  Do not knead.  Just add them in and stir them to combine them.  Once done, set aside covered with a towel and allow to rest at room temperature for about 2 hours. 

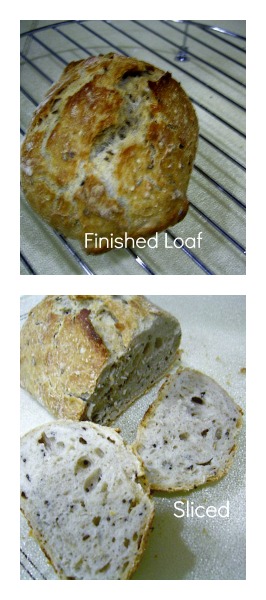
I actually went back to the dough exactly 2 hours later.  Dusted the surface of the dough in the storage bowl with flour, and my hands and parchment paper, grabbed about 1/4 of it and dusted it while making it into a ball and then oval to put onto the parchment to rise for about 40 minutes.Rye bread done and sliced
In the meantime, I preheated my dutch oven at 450 degrees.  I used this method instead of the pizza stone, and water method to get a crispy crust because I cannot do the cornstarch wash.  If I wanted caraway on the outside of my bread I would roll my bread dough in the seeds before putting it into the dutch oven.

Once it’s oven ready, I quickly open the dutch oven, throw in the bread – slash a few deep cuts into it and place back the lid.  I cook it for about 20 – 30 minutes and then remove the lid.  I cook it for an additional 10-15 minutes for that nice brown crust to form. 

Remove to cooking rack and wait till it cools before you cut it!  This recipe is a keeper for me. The bread is delicious and the preparation is easy and quick. I can’t wait to make the remainder of the loaves (the recipe can make about 4 – 1 lb loaves!)

 

Unsubscribing


unsubscribe from email, subscriptions and other junk

Unsubscribing ~ shouldn’t this be pretty easy?  Certainly not annoying?   But no, it seems unsubscribing isn’t “just click here” anymore.

For one thing advertising rates and other factors are determined by just how many subscribers a magazine, a blog, a newsletter, twitter or facebook page has acquired.  It isn’t quite as simple as that sounds, but it is a number calculated using the number of subscribers, the demographics of the subscribers and other factors.  If your subscribers go down, less people will see the advertisers’ ads and the ad revenue for the publication will also go down.

Here’s some ways a publication might keep it’s numbers up and maybe even get you as a subscriber.

  • Subscribe people who don’t really want the publication.

Major magazines, for example, often offer a sweepstakes or giveaway to entice you to enter and when you enter – even though you aren’t fully aware it’s happening —- you are subscribed.   Normal sweepstakes can’t require you to purchase anything, and certainly this method is deceptive and should be a violation, but it continues to be employed by many major magazines.  Sometimes even if you do check you don’t want their publication, it doesn’t mean you won’t get it.  After all your name adds to their subscribers and that increases their revenue. The good news, if there is any, is that you can cancel your subscription, online or by mail.  You have to wait a few days and go online to unsubscribe, or wait for the bill. Once you have the bill, all you need to do it write “cancel” across it and send it back in.  Which leads to the other reason they employ this trick – so many people think they are “stuck” and cannot cancel (worrying about credit score, and such)- that those people wind up keeping  and paying for the subscription.

  • Ignore people who want to unsubscribe

This specifically is aimed towards the political newsletters.  You know who you are.  I have unsubscribed at least 10 times and I still am getting your messages whether I want them or not.  Another offender in this list is the one that tells you that you will be off the list in 2 – 14 days – meaning by the time you see and realize we didn’t unsubscribe you – we will have also bombarded you with our message every day for 14 more days….and then you have to try to unsubscribe again.

  •  Make it hard to unsubscribe

By law, there needs to be a button that allows someone to unsubscribe from your email based newsletter and advertisements – commonly called spam.  To keep people on their list, they don’t let them see the button, don’t put a button or make it go “nowhere” once they push it.  When the unsubscribe link goes to a page with an error, it becomes a hassle and time consuming, so the recipient gives up.  There are many companies employing this tactic – but the worst one is a company that has made the “unsubscribe” information the same color as the background of their advertisement.  So technically it’s there, you just can’t see it.

 All these ways are unacceptable, but fairly common practices.   My advice is if you want to unsubscribe, let the publication know that you do – by calling or sending an email.  If you cannot get anywhere let them know you are reporting the email as spam and will continue to do so until they stop sending it to you.  If even that isn’t working, block their URL so that you don’t get their mail at all.  Eventually I do believe the consumer should win this battle.

Cooking Again – Spicy Pork Roast

Now that I am getting back to normal, and I have so much less on my plate to do for others (see Change is Inevitable), I have decided that I really need to start cooking again.  Lest you think that’s a joke, let me tell you, I have not cooked anything from scratch in a long time because of the heat, the power outages, or just plain exhaustion after working all day.

The heat and humidity around here has been unbearable most days – for the entire month of July.  That scenario drains all the energy from my old body and it makes me totally unmotivated to do anything.  And although I made sure I completed all the things I had to each day, anything and everything that could be – was put on hold.  And, I didn’t cook. 

Yesterday, I decided I needed to start cooking again.  I had a pork roast thawed, so I decided to make a medium hot and spicy pork roast.  This is out of my normal comfort zone.  I could have made something I had made 100 times before with 100% success, but there was no fun in that.  I also decided I did not want to use the oven – and considered the crock pot, but decided on the dutch oven on the stove top, which was also a first for me!

First I gathered information on the internet on which spices I needed to use, and how to combine them.  I did this by reading recipes for spicy pork roasts.  I didn’t see any that involved all the ingredients below, but many contained some of them and they gave me the inspiration to “try” what I thought would work. My main influence was from a Filipino recipe I saw and the resulting “praises” from the people who had tried that recipe. 

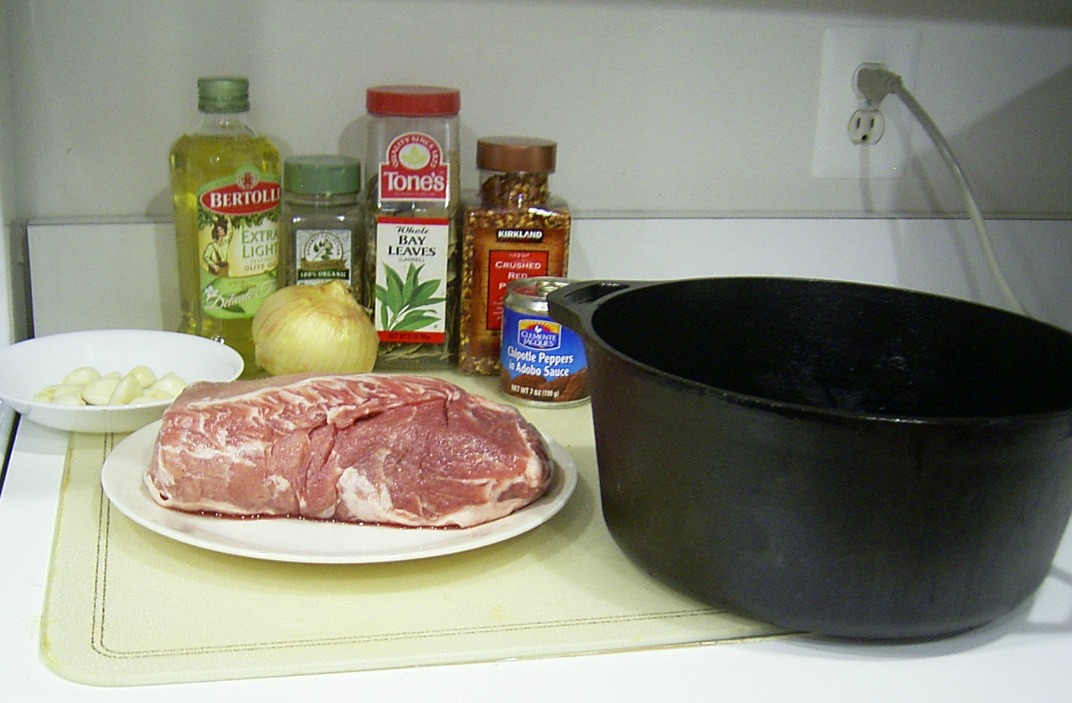
The picture is the ingredients I originally assembled, but as you can see I added more. Ingredients for Spicy Pork Roast

 3.5 – 4 lb. Boneless Pork Roast
4 – Yukon Gold Potatoes peeled and cubed (large cubes)
2 Tablespoons Oregano
3 Bay Leaves
1 Medium Garlic bulb – peeled and separated
Olive Oil – as needed
1 Medium Sweet Onion- sliced and chopped
½ Teaspoon of Crushed Red Pepper
1 small can of Chipotle Peppers in Adobe Sauce
¼ Cup of Kikkoman Soy Sauce
2 Tablespoons of White Vinegar
½ Cup of Water
Cup of Sugar

The first step for me was to make that spicy hot sauce.  I used my Cuisinart Chopper/Grinder and added the entire can of chipotle peppers, the 2 tablespoons oregano, all but 2 of the larger cloves of garlic, ¼ of the onion, ½ cup of water, ¼ cup of soy sauce, ½ tsp. of the crushed red pepper, ⅓ cup of sugar and 2 tablespoons of white vinegar.  I ground/chopped/combined it and then put it into a bowl and set it aside.

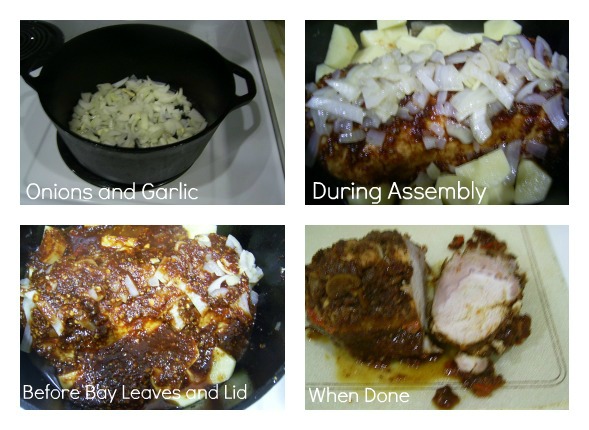
Next I put a little olive oil in my dutch oven over medium heat on the stove top and added the remaining garlic (which I had sliced thin) and all of the remaining onions.  I cooked them till the smell was amazing and the onions were just getting transparent.  It didn’t take long.  I put them in another bowl on my counter and proceeded to brown the pork roast on all 4 sides. 

Once the pork roast was browned,  I put ½ of the sauce I had made over the top, making sure to “paint” the roast with it.  I put the potatoes in on both sides of the roast, added the onion and garlic to the top of the roast, and put the remainder of the sauce on top.  Last I added the 3 bay leaves, and put the top on to start it cooking.

Spicy Pork Roast Pictures
Just 1 hour later on low – it was done.  I immediately removed and discarded the bay leaves. I think if I make this again, and you can bet my family is already hoping for that – I’ll try checking it a little earlier because the internal temperature of the pork was a little higher when I checked it than I needed.  It was still delicious.  My son gave me the ultimate compliment when he said it was spicy and sweet when you ate it and then gave you a punch of heat. He said I should make this my “signature” hot sauce.  That sure makes me want to try it with some chicken or shrimp!

Change is Inevitable

No matter what you do in life, change is inevitable. There are probably very few things you can point to and say, that hasn’t changed in the last 50 years.  People, places, fashion, design and ways of life all change.

And change is good.   Even if you just think about communication and how it’s changed.   Not all that long ago, if you needed information on something, you had to find someone to ask, or go to the library and look it up.  And while at the friends or the library, you were at the mercy of only understanding what someone knew, or took the time to write in a book and nothing more.   Change has given us cell phones and the internet which we use in much the same way to gather information and communicate today. 

I have recently had a change in my own life and I am so glad it happened.   It wasn’t something I tried to do, it was someone who forced it on me, and well, I like it.  The last few days have eliminated so much pressure on me. I just didn’t realize that doing something I thought I really wanted to do was causing such pressure, until it was over.  It wasn’t as sudden as it seemed, nor did I understand 100% what was going on, but it’s all good!  So now to quote Ecclesiastes 3:1 (King James Version) or the Lyric from the Byrds song, Turn! Turn! Turn!

freedom change is inevitable

And to this particular event, there was.  The way God uses situations, moves you from place to place, takes the time to “sour” the grapes that were once tasty morsels to force you to move or others to push you out – in one word – Amazing!  The person (people) involved had an agenda, and were committed to it, and I respect that.  I didn’t share their viewpoints (my age could be a factor in that) on many subjects.  I didn’t agree on how they were doing things, but I went along with the flow as best I could.   I thought I would understand the path, once I got to the end of it, and so I tried hard to stick it out.  I thought I had the freedom to speak up, and the potential to initiate change, but I really didn’t.  The original idea when I signed on was more flexible, but with flexibility comes those who don’t perform, and so rules were made.   Eventually that chain of events caused universal rules to be forced on the participants.  I don’t do forced rules well.  I am the owner of a company that has been in existence for over 27 years.  It has and will, succeed or fail based on my knowing when to change the rules and when to enforce them.  In my company, there has never been a time, or a place where one’s opinion was not considered.  You just never know when someone will think of an innovative solution to a perplexing issue, and you have to be ready for it. 

The reasons I had joined the group, and the focus of the group for me had changed.  The new rules without flexibility requiring participation was not for me.  I didn’t sign up for to be ordered around and required to do anything but participate.  Certainly not to help with administration duties, or do the job of the owner of the group.  So, to those I will miss now that I am “out”.  Thank you!  Thank you for being a part of my life, sharing, caring and being “you” so that I could learn so much.  Just know that I really am happier, less stressed and feeling free being out – and that I know and believe that God worked this resolution out specifically for me,  and I am happy He did.

 ***The title of this article is from my friend, Ronda who reminded me about change and who calmed the waters with just those few words.
***These are the trees in front of my house.

Recycling Floppy Disks Shouldn’t be Annoying

 When it comes to Floppy Disks, you have a variety of recycling choices. 

The first and the best way is to reuse them.  Floppy disks can last a long time.  Information can be written, deleted, or overwritten hundreds of times before the magnetic disk surface that retains that information wears out.  They can also be reformatted to clean off all the previous data, and then re-written with new.  There is so much more I could tell you about floppy disks that likely would surprise you – but alas, this article is about recycling them.

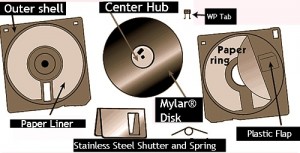
The second way is to recycle their parts.  Floppy disks besides being older are significantly different than CD and DVD media. For one thing they are made up of parts which when you unassemble them can each individually be recycled. The recording part of a floppy disk is a flexible piece of iron oxide film rather than a hard plastic surface like a CD and DVD.  The 3½” floppy disk has some additional steel parts over the 5¼” or 8” ones but otherwise they are similar.  Individually the parts we would need to recycle would be:

diskinsides1


  • Plastic – the outer plastic shell or housing, a plastic write protect tab and a plastic wiper tab.  These are all made of Polyvinyl Chloride and a recyclable #3  plastic.3-1Collage
  • Metal – a metal shutter, the spring and the hub are all made of stainless steel.  
  • Paper – A set of paper rings or liners (these liners are attached to the plastic housing and are used to clean the disk as it spins).  Paper, of course is recyclable.
  • Magnetic Disk – A “recording” ring which is made of pliable Mylar® – a polyester film coated with iron oxide (the same materials as cassette and videotape recording surfaces).  Mylar® is Polyethylene Terephthalate and recyclable as a #1 plastic.

The third way to recycle them is to use them in some crafty art projects.  Earlier this year, I sold over  100 – 3.5” perfectly good floppy disks to a person who used them to make unique coasters which she then sold on Esty.  In fact if you check out Esty here: Floppy Disk Crafts.  you will see some unique ideas for using them.

Here are some of the idea’s I liked for craft projects.floppy2Collage

Floppy disks stopped being produced last year and the remaining supply is limited.  So reuse, recycle or re-purpose, the choice is yours.


~~~~

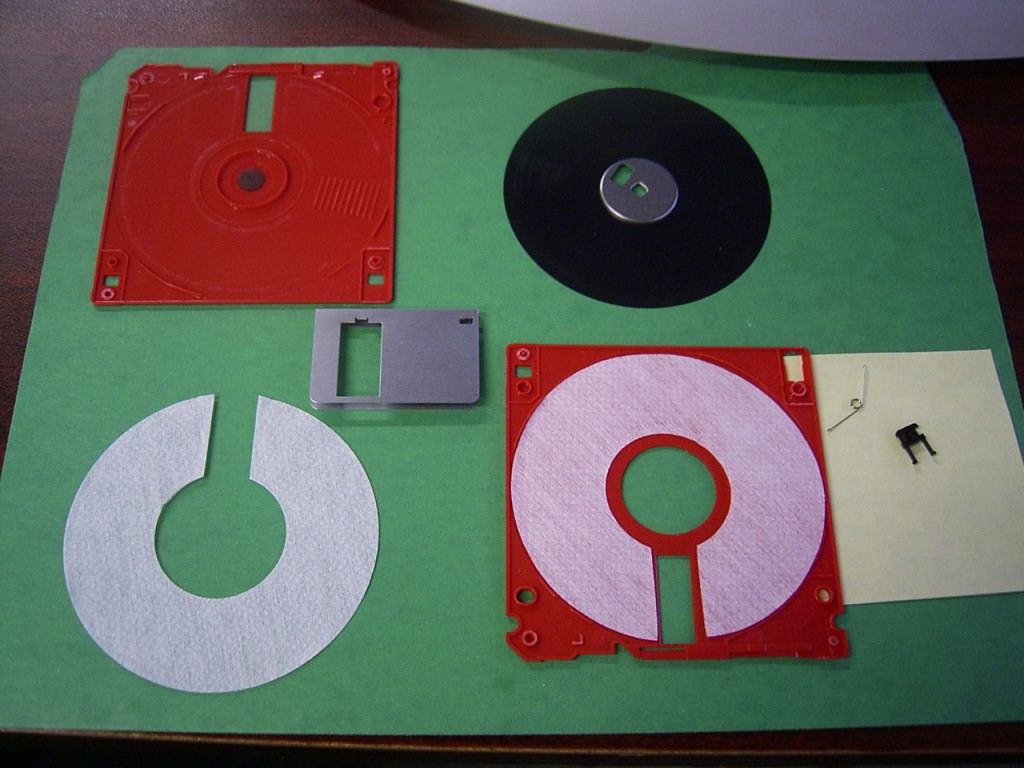
Reply to question below – 01/15/13

Here’s what my dis-assembled floppy looked like:

R0013615